在python中连接hive和impala有很多中方式,有pyhive,impyla,pyspark,ibis等等,本篇我们就逐一介绍如何使用这些包连接hive或impala,以及如何通过kerberos认证。
如果集群没开启kerberos认证则不需要这里的代码,或者在系统环境内通过kinit命令认证也不需要这部分的代码。
krbcontext.context_shell
# -*- coding: utf-8 -*- __all__ = [ 'krbcontext', 'KRB5KinitError', ] import os, sys # import pwd import subprocess from contextlib import contextmanager class KRB5KinitError(Exception): pass # def get_login(): # ''' Get current effective user name ''' # # return pwd.getpwuid(os.getuid()).pw_name def init_ccache_as_regular_user(principal=None, ccache_file=None): '''Initialize credential cache as a regular user Return the filename of newly initialized credential cache ''' if not sys.stdin.isatty(): raise IOError('This is not running on console. So, you need to run kinit ' 'with your principal manually before anything goes.') cmd = 'kinit %(ccache_file)s %(principal)s' args = {} args['principal'] = principal args['ccache_file'] = '-c %s' % ccache_file kinit_proc = subprocess.Popen( (cmd % args).split(), stderr=subprocess.PIPE) stdout_data, stderr_data = kinit_proc.communicate() if kinit_proc.returncode > 0: raise KRB5KinitError(stderr_data) return ccache_file def init_ccache_with_keytab(principal, keytab_file, ccache_file): '''Initialize credential cache using keytab file Return the filename of newly initialized credential cache ''' cmd = 'kinit -kt %(keytab_file)s -c %(ccache_file)s %(principal)s' args = {} args['principal'] = principal args['ccache_file'] = ccache_file args['keytab_file'] = keytab_file kinit_proc = subprocess.Popen( (cmd % args).split(), stderr=subprocess.PIPE) stdout_data, stderr_data = kinit_proc.communicate() if kinit_proc.returncode > 0: raise KRB5KinitError(stderr_data) return ccache_file @contextmanager def krbcontext(using_keytab=False, **kwargs): '''A context manager for Kerberos-related actions using_keytab: specify to use Keytab file in Kerberos context if True, or be as a regular user. kwargs: contains the necessary arguments used in kerberos context. It can contain principal, keytab_file, ccache_file. When you want to use Keytab file, keytab_file must be included. ''' env_name = 'KRB5CCNAME' old_ccache = os.getenv(env_name) if using_keytab: ccache_file = init_ccache_with_keytab(**kwargs) else: ccache_file = init_ccache_as_regular_user(kwargs.get("principal"), kwargs.get("ccache_file")) os.environ[env_name] = ccache_file yield 使用pyhive连接hive
环境
""" decorator==4.4.2 future==0.18.2 gssapi==1.6.5 krbcontext==0.10 PyHive==0.5.0 impyla==0.14.1 sasl==0.2.1 six==1.11.0 thrift_sasl==0.3.0 # 如果使用ibis或impyla需要thrift_sasl==0.2.1 thrift==0.13.0 thriftpy==0.3.5 """ from pyhive import sqlalchemy_hive,hive from krbcontext.context_shell import krbcontextKerberos认证
两种方式,一种是在系统环境内让当前用户通过kinit 先保持kerberos的认证,那所有的代码里就无需再写kerberos认证代码了。另一种方式,在python脚本内使用下面的代码进入kerberos认证会话:
config = { "kerberos_principal": "hive@CSDNTEST.COM.LOCAL", "keytab_file": '/home/tools/wyk/keytab/hive.keytab', "kerberos_ccache_file": '/home/tools/wyk/keytab/hive_ccache_uid', "AUTH_MECHANISM": "GSSAPI" } with krbcontext(using_keytab=True, principal=config['kerberos_principal'], keytab_file=config['keytab_file'], ccache_file=config['kerberos_ccache_file']): #在这个代码块内执行的脚本都是在kerberos认证内的。 #可在此代码块内查询hdfs hive hbase等等只要是kerberos principal有权限的组件都可以使用
下面的代码需要在上面的kerberos代码块内才能通过kerberos认证,如果集群没有开启kerberos认证或当期系统已使用kinit进行了认证则无需上面的代码:
con = hive.connect(host='uatnd02.csdntest.com.local',port=10000,auth='KERBEROS',kerberos_service_name="hive") #host为hiveserver2所在节点,port默认10000,为hs2的端口 cursor = con.cursor() cursor.execute('select * from dl_nccp.account limit 5') #不能有分号! # cursor.execute('desc dl_nccp.account') #不能有分号! datas = cursor.fetchall() print(datas) cursor.close() con.close()
环境
""" decorator==4.4.2 future==0.18.2 gssapi==1.6.5 krbcontext==0.10 PyHive==0.5.0 impyla==0.14.1 sasl==0.2.1 six==1.11.0 thrift_sasl==0.2.1 # 只有这个与pyhive的不一样 thrift==0.13.0 thriftpy==0.3.5 """ from impala.dbapi import connect from krbcontext.context_shell import krbcontextKerberos认证
与上面的pyhive一样,略
使用
#impyla thrift==0.2.1 与ibis依赖版本相同,可同时使用 conn = connect(host='uatnd02.csdntest.com.local', port=10000, auth_mechanism='GSSAPI',kerberos_service_name='hive') cur = conn.cursor() cur.execute('SHOW databases') #不能有分号 cur.table_exists(table_name='account',database_name='dl_nccp') #return True or False cur.ping() #return True or False cur.status() #return True or False cur.get_table_schema(table_name='account',database_name='dl_nccp') #return 表结构 类似desc print(cur.fetchall()) cur.close() conn.close()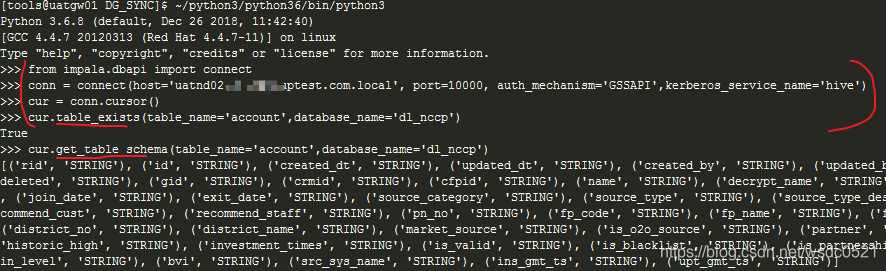
ibis是个很强大的第三方环境包,支持对各类数据库或文件系统进行访问,功能强大,并返回pandas dataframe格式,对数据开发人员很友好,这个包我用了两年多,非常推荐。
官方文档:https://docs.ibis-project.org/getting-started.html
环境
""" ibis-framework==0.14.0 #pip install ibis-framework[impala]==0.14.0 decorator==4.4.2 future==0.18.2 gssapi==1.6.5 krbcontext==0.10 PyHive==0.5.0 impyla==0.14.1 sasl==0.2.1 six==1.11.0 thrift_sasl==0.2.1 # 只有这个与pyhive的不一样 thrift==0.13.0 thriftpy==0.3.5 """Kerberos认证
与上面的pyhive一样,略
使用
官方文档以及源码里还有很多函数可供使用,这里仅列出常用的一些,建议使用ibis包的可以看看源码或官方文档。
import ibis import pandas as pd import ibis.expr.datatypes as dt conf={ "impala_host":"uathd01.csdntest.com.local", "impala_port":21050, "kerberos_service_name":"impala", "auth_mechanism":"GSSAPI", "webhdfs_host1":"uatnd01.csdntest.com.local", "webhdfs_host2":"uatnd02.csdntest.com.local", "webhdfs_port":9870 #如果是hadoop3之前的版本这里的参数改为50070 } #获取hdfs连接 try: hdfs_client = ibis.hdfs_connect(host = conf["webhdfs_host2"], port = conf["webhdfs_port"], auth_mechanism = conf["auth_mechanism"], use_https = False, verify = False) hdfs_client.ls('/') except: hdfs_client = ibis.hdfs_connect(host = conf["webhdfs_host1"], port = conf["webhdfs_port"], auth_mechanism = conf["auth_mechanism"], use_https = False, verify = False) #获取impala连接 impala_client = ibis.impala.connect(host=conf["impala_host"], port=conf["impala_port"], hdfs_client = hdfs_client, auth_mechanism=conf["auth_mechanism"], timeout = 300) # 直接读表,select * from dh_sales.r_order limit 10,返回pandas dataframe res = impala_client.table('r_order', database='dh_sales').execute(limit=10) print(type(res)) print(res.dtypes) print(res) #使用SQL查询impala res = impala_client.sql("""select area,is_oversea,dw_ins_ts,sum(gid_cnt) from dh_t3_report_crm.r_duration_area_metr where is_oversea=0 group by 1,2,3 limit 5""") df_res = res.execute() print(df_res) #列库下所有表 impala_client.list_tables(database='dl_common') #使用pandas dataframe建表,类型自动映射 impala_client.create_table(table_name='ibis_create0602',obj=sys_dict,database='default',force=True) ... #pd_res_acc 略 #pd_res_cre 略 ... #使用pandas datraframe插入数据 impala_client.insert(table_name='tmp_account',obj=pd_res_acc,database='default',overwrite=True) impala_client.insert(table_name='ibis_create',obj=pd_res_cre,database='default',overwrite=True)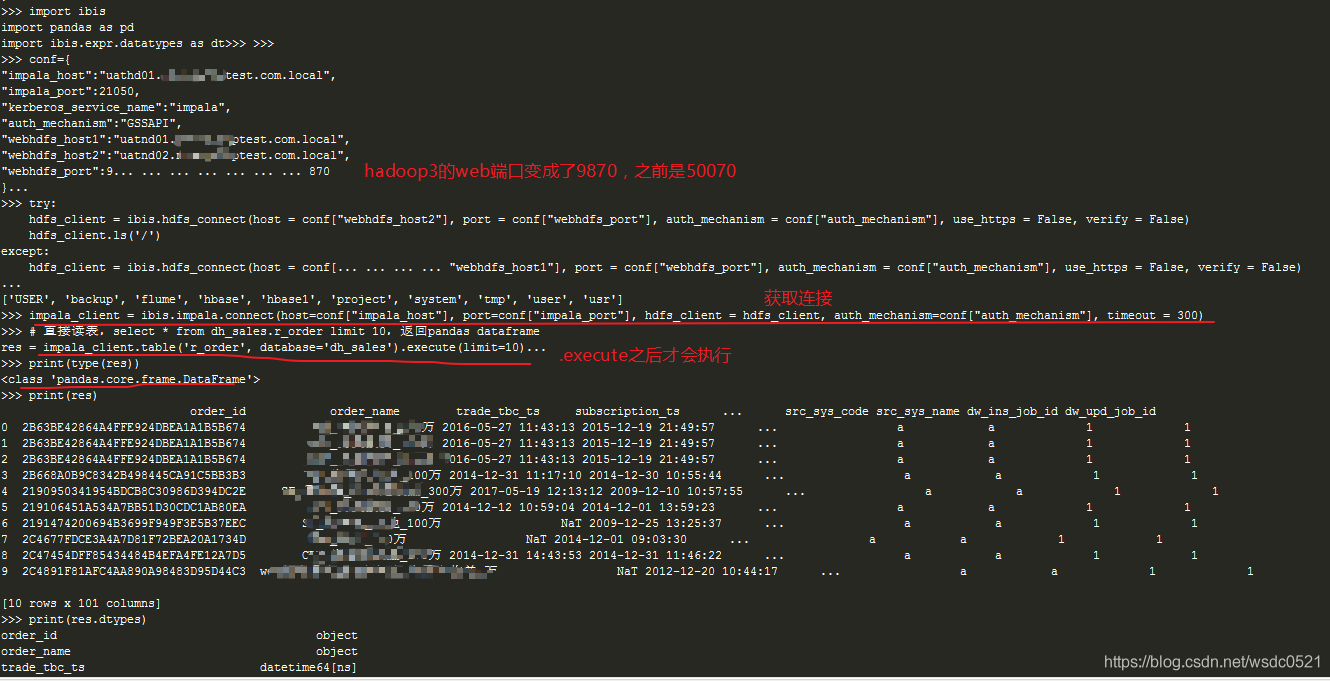

![]()
BUG解决
执行insert或create命令可能会报下面的错误,这个是源码级别的BUG,参考下面的连接修改源码即可解决:
UnicodeEncodeError: 'latin-1' codec can't encode characters in position 160-161: ordinal not in range(256)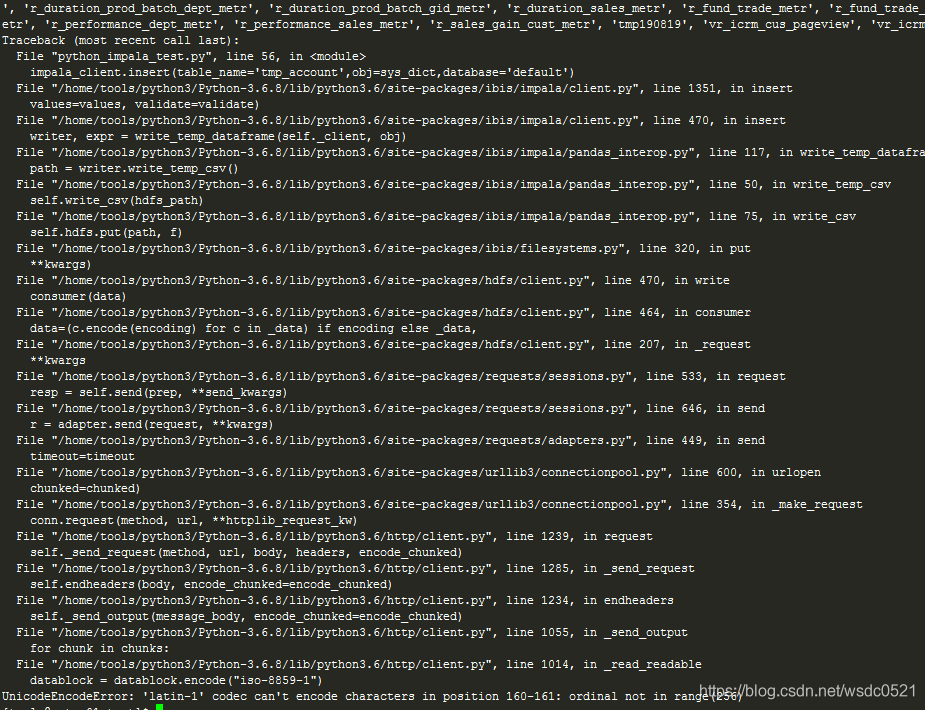
参考:https://github.com/ibis-project/ibis/issues/2120
vim /home/tools/python3/Python-3.6.8/lib/python3.6/site-packages/hdfs/client.py

环境
vim /etc/profile
export SPARK_HOME=/opt/cloudera/parcels/CDH/lib/spark export SPARK_CONF_DIR=$SPARK_HOME/conf export PYTHONPATH=/home/tools/anaconda3/envs/csdn/bin export PYSPARK_PYTHON=/home/tools/anaconda3/envs/csdn/bin/python3.6""" pyspark==2.4.5 """kerberos认证
与上面的pyhive一样,略
使用
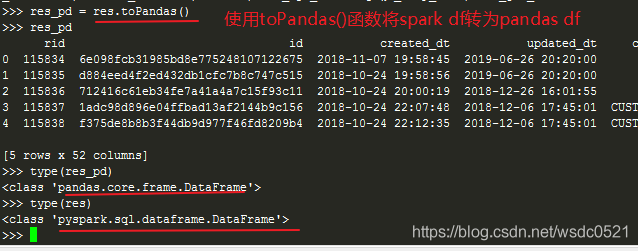
使用pyspark连接hive进行查询,并将spark dataframe转为pandas dataframe:
from __future__ import division #import findspark as fs #fs.init() import pandas as pd from pyspark.sql import HiveContext,SparkSession,SQLContext from pyspark import SparkContext, SparkConf import pyspark.sql.functions as F import datetime as dt from datetime import datetime import random import numpy as np from log3 import log_to_file, log from pyspark.sql.types import * conf = SparkConf().setMaster("yarn").setAppName("MF_return_calc") sc = SparkContext(conf=conf) sc.setLogLevel("WARN") hiveCtx = HiveContext(sc) spark = SparkSession.builder.master("yarn").appName("MF_return_calc").config("spark.debug.maxToStringFields", "100").getOrCreate() #执行SQL test_sql = """select * from dl_nccp.account limit 5""" res = hiveCtx.sql(test_sql) type(res) #返回spark dataframe res.head(3) res_pd = res.toPandas() #将spark dataframe转为pandas dataframe res_pd
好了上面四种在python中访问hive和impala的方式就介绍完了,希望对大家有帮助,谢谢!
希望本文对你有帮助,请点个赞鼓励一下作者吧~ 谢谢!
热门文章
- 12月9日|22.2M/S,最新高速免费节点,Shadowrocket/Clash/V2ray/SSR订阅链接地址,科学上网
- 猫味道很大房屋内怎么去除(房间猫咪异味怎样彻底清除)
- 在打包vue项目时报错的问题解决
- 2月28日|20.2M/S,最新高速免费节点,Shadowrocket/SSR/Clash/V2ray订阅链接地址,科学上网
- 南京领养猫咪要求(南京在哪领养猫)
- 1月24日|20.5M/S,最新高速免费节点,Clash/V2ray/SSR/Shadowrocket订阅链接地址,科学上网
- 天津免费领养猫咪贴吧(天津领养猫猫)
- 12月19日|22.6M/S,最新高速免费节点,V2ray/Clash/Shadowrocket/SSR订阅链接地址,科学上网
- 同安宠物猫店 同安宠物猫店地址
- 丹阳宠物领养(丹阳宠物救助站)